Part 1 - Deploying a Go REST API to AWS with Serverless

It’s not just all about Node.js and JavaScript chatter anymore! Brace yourself for some Go goodness. Did you know you can whip together a Go HTTP API with just a sprinkle of code and effortlessly send it soaring into the AWS clouds using Serverless?
In this series, we’re going to dive into the world of Go APIs, hook them up to a MySQL database on Planetscale, and unleash them on AWS with the magic of Serverless.
What we’re going to cover
- Installing Go
- Creating our API with Gin
- Creating our build
- Deploying with Serverless
Installing Go is pretty straight forward you can go to their website here to download and install Go.
Once it’s installed go version in your CLI should output something like this.
➜  go version
go version go1.21.6 darwin/arm64
Once done, create a new project by executing mkdir go-serverless-api, entering the directory with cd, and initiating the project using go mod init. This command creates a go.mod file, similar to Ruby’s Gemfile or Node.js’ package.json, keeping tabs on our project’s dependencies.
mkdir go-serverless-api
cd go-serverless-api
go mod init go-serverless-api
Creating our App
Now that we have the project directory setup we can create a main.go file.
touch main.goOnce that file is created we can open up the project in our code editor and add this into the main.go file.
package main // puts our collection of functions under main package

// import the format package for logging
import (
	"fmt"
)

// main is the function go runs
func main() {
  fmt.Println("Hello, world!")
}
The above is a basic Go project that will print “Hello, world!” when you run go run main.go in your CLI.
Installing Gin
The next thing we want to do is install a package called Gin. Gin is an HTTP framework for Go similar to something like Express for Node.js.
We can install the Gin package by running this in our CLI
go get -u github.com/gin-gonic/ginThis will fetch the package and add the dependency to your go.mod file similar to how npm install would work with package.json.
Once we have Gin installed we can modify the main.go file and add the Gin Router which will handle our routes and connect to our controllers eventually.
package main

// import the gin package
import "github.com/gin-gonic/gin"

func main() {
	// create the router
	r := gin.Default()

  // create a /ping GET route
	r.GET("/ping", func(c *gin.Context) {
		// return a 200 JSON response { message: "Pong" }
		c.JSON(200, gin.H{
			"message": "Pong",
		})
	})

  // listen and serve the server on localhost:3000
	r.Run({
      Addr: ":3000",
	})
}
Now with that code added in our main.go you should be able to run go run main.go and see the Gin server running listing our /ping GET route. With the server running in another CLI tab we can run the CURL command below and we should see the JSON response.
CURL http://localhost:3000/ping
{"message": "Pong"}
Awesome we have a basic HTTP server running with Go and it didn’t take too much effort. Now let’s get our API deployed to AWS with Serverless.
Creating a deployable build
To deploy our app we need a Go executable for our Lambda handler. To create our builds and handle deployments we can create a Makefile and add the build command below.
build:
	env GOOS=linux GOARCH=amd64 go build -ldflags="-s -w" -o bin/main main.go
When you run this it’ll build a new executable in the /bin directory called main. We’ll give this to Serverless as our Lambda function handler so it knows what to run. You can run make build to create a build and should see a new /bin directory appear.
Creating our Serverless.yml
Now that we have a basic HTTP server running let’s get it deployed to AWS. To get our Go API deployed to AWS we’re going to use Serverless. Serverless let’s you define your application and wires everything together in the cloud during deployment.
Let’s take a look at our serverless.yml file which defines are application infrastructure and breakdown what each thing is doing.
- service - the name of the application
- provider - AWS, Google Cloud, etc.
- stage - ${opt:stage, ‘dev’} means it defaults to ‘dev’ unless a flag was added in CLI
- functions - describing our HTTP endpoints and handlers, in our case we just have one /{proxy} route that passes through to our main.go app and the Gin router handles the rest
- handler: bin/main - this is the binary build we were just creating a Makefile for
service: serverless-go
frameworkVersion: '3'
provider:
  name: aws
  runtime: go1.x
  region: us-east-2
  stage: ${opt:stage, 'dev'}
  environment:
    stage: ${opt:stage, 'dev'}

functions:
  api:
    handler: bin/main
    events:
      - http:
          path: /{proxy+} # Use a wildcard for the path
          method: ANY
          cors: true

# define what is included
package:
  patterns:
    - bin/**
    - go.mod
    - go.sum
Creating a Serverless IAM role in AWS
Next for Serverless to send our Go API soaring onto the AWS clouds we need to create a IAM account in AWS with Admin access to deploy our infrastructure.
Insert image of AWS IAM policy here
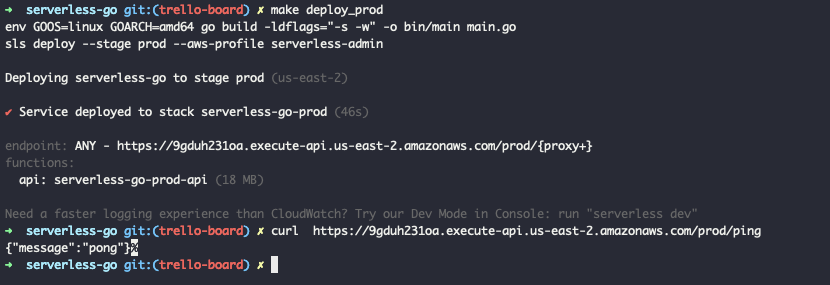
Once you have an IAM user created called serverless-admin you can modify your Makefile and add a command called deploy_prod which will look like.
build:
	env GOOS=linux GOARCH=amd64 go build -ldflags="-s -w" -o bin/main main.go

deploy_prod: build
	sls deploy --stage prod --aws-profile serverless-admin
The new deploy_prod command will deploy our API using the serverless-admin IAM user we just created. If this doesn’t work you might need to install AWS CLI and run aws configure to add your AWS IAM account. If you’ve used the AWS CLI before you can add the account we just created to your ~/.aws/credentials and serverless should pick it up when you run the deploy command.
[default]
aws_access_key_id = qwe
aws_secret_access_key = qwe

[serverless-admin]
aws_access_key_id = qweqwe
aws_secret_access_key = qweqwe
If everything is working as expecting you should see a Cloudformation screen in the CLI showing you which resources are being updated. After you hit Y to deploy resources you should see an API url that we can CURL to get our pong response.
In part 2 we’ll setup a Go ORM called GORM and connect our API to a MySQL database on Planetscale. If you’re unfamiliar with ORMs, ORM stands for Object Relational Mapping. ORMs basically help you map your structs or data models to various database adapters like MySQL so we can have an API interface for querying, joining data, updating, etc. that make DBs much easier to use.
Stay tuned for Part 2!